
Accessing hidden TV settings can greatly improve your picture quality by giving you access to advanced controls like white balance, gamma, color temperature, and motion smoothing. By adjusting these options carefully, you can achieve more accurate colors, better contrast, and smoother motion. Most TVs have secret menus or service modes for tweaking these parameters, but you need to know how to access them safely. Keep going to discover how to fine-tune your display for the best viewing experience.
Key Takeaways
- Access hidden menus like Service or Expert Mode to unlock advanced picture calibration settings such as white balance and gamma.
- Adjust motion smoothing and frame interpolation settings (e.g., Auto Motion Plus) to reduce blur and judder for clearer motion.
- Fine-tune color temperature, saturation, and color space options to achieve more natural and accurate colors.
- Calibrate backlight, contrast, and brightness levels for optimal detail in dark and bright scenes.
- Save custom profiles for different viewing modes and regularly recalibrate to maintain peak picture quality over time.
Why Hidden TV Settings Make a Difference
Hidden TV settings often hold the key to substantially improving your picture quality because they allow you to fine-tune your display beyond the basic options. When you perform video calibration, you adjust parameters like brightness, contrast, and color accuracy, resulting in a more realistic and vibrant picture. These hidden options enable display enhancement, helping you eliminate issues like dull colors or washed-out images. By tweaking these settings, you can optimize your TV’s performance to match your viewing environment, whether you’re watching movies or gaming. Without accessing these hidden features, you miss out on revealing your TV’s full potential. Proper calibration and display enhancement ensure sharper images, richer colors, and more accurate visuals—transforming your viewing experience from average to exceptional. Additionally, understanding TV gear care and eco-friendly disposal tips can help maintain your equipment and reduce environmental impact. Exploring contrast ratio adjustments can further enhance your ability to achieve deeper blacks and brighter whites, elevating overall picture quality. Recognizing advanced picture settings can unlock even more customization options that tailor your display to personal preferences and specific content types. Taking advantage of these hidden features can make a noticeable difference in how you perceive picture quality on your TV, especially when you experiment with color calibration to fine-tune hues and saturation.
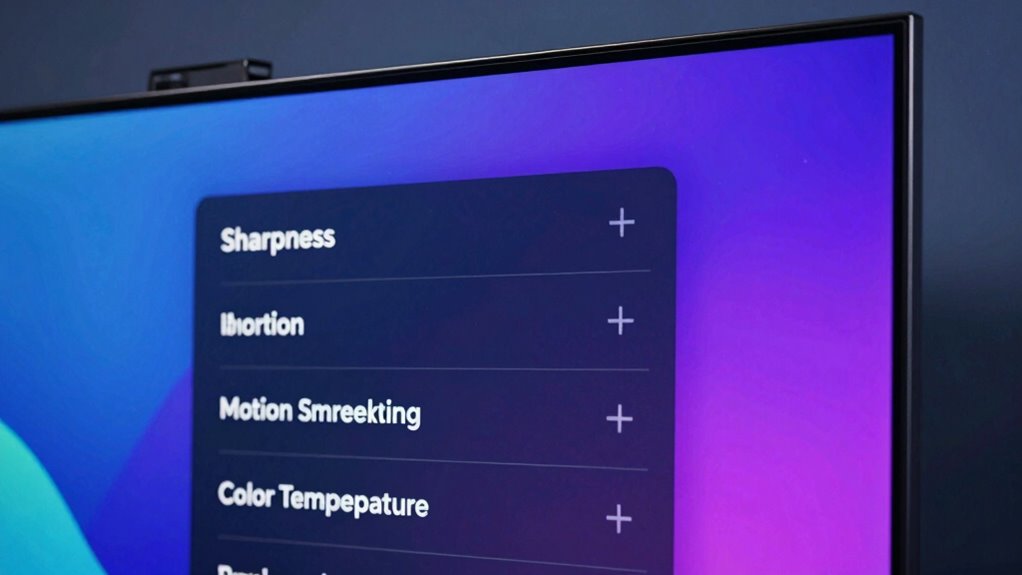
How to Access Hidden Settings on Your TV

To access these secret settings on your TV, you’ll need to navigate through its menu system using the remote control. First, press the menu or settings button. Sometimes, you’ll need to perform a specific sequence, like pressing a combination of buttons or holding a button for a few seconds. Keep your remote controls handy, as different brands have unique methods. Additionally, confirm your firmware is up to date, as firmware updates often open or improve hidden menus. Once inside, look for options like “Service Menu,” “Advanced Settings,” or “Expert Mode.” Be cautious—altering certain settings can affect your TV’s performance. Remember, accessing these hidden settings can give you more control over picture quality, but always proceed carefully to avoid unintended issues. Exploring regional flavors and insights can also enhance your viewing experience by tailoring picture settings to specific content types. Furthermore, gaining an understanding of hidden menus can help you troubleshoot and optimize your TV’s display more effectively. Knowing how to identify and navigate hidden settings can lead to significant improvements in picture quality and overall performance, especially when you understand the digital concepts behind these adjustments. Additionally, being aware of manufacturer-specific menu options can help you customize your viewing experience further.
Adjusting Picture Modes for Better Viewing
Start by choosing the most suitable picture mode for your content, like Cinema or Game, to enhance your viewing experience. Then, tweak the brightness settings to match your room’s lighting and prevent eye strain. Additionally, using visual cues can also help optimize picture clarity and quality. When adjusting settings, keep in mind that calibration techniques can further refine your TV’s display for optimal performance. Exploring standardized field programs can help establish consistent methods for assessing and improving picture quality across different devices. Implementing these practices may also involve regular maintenance to keep your TV functioning at its best. Finally, experiment with the color temperature settings to achieve natural-looking colors that suit your preferences.
Choose Optimal Mode
Choosing the right picture mode is essential for achieving ideal picture quality on your TV. Selecting the optimal mode ensures your display’s color calibration and screen calibration are tailored to your viewing environment. Most TVs offer modes like Standard, Movie, Gaming, or Dynamic, each emphasizing different picture qualities. To improve your experience, consider these tips:
- Switch to Movie or Cinema mode for accurate color calibration, reducing overly saturated colors.
- Use Game mode if you want minimal input lag without sacrificing too much picture quality.
- Adjust the mode based on ambient lighting, which affects how your TV’s screen calibration appears.
- Understanding display calibration can help you fine-tune your settings for the best viewing experience.
- Being aware of microplastics in dust and their impact on indoor air quality highlights the importance of maintaining a clean environment, which can also influence your overall viewing comfort.
- Regularly checking and adjusting your TV’s settings can prevent display degradation, ensuring consistent picture quality over time.
Adjust Brightness Settings
Adjusting brightness settings is a key step in optimizing your TV’s picture quality after selecting the right mode. Proper brightness ensures details in both dark and bright scenes are visible without losing contrast. To get the best picture, consider your room’s ambient light—bright rooms may require higher brightness levels, while darker rooms benefit from lower settings. Brightness adjustments also impact color calibration, helping colors appear more natural and true to life. Use your TV’s built-in brightness controls to find a balance that maintains detail in shadows without washing out highlights. Take your time to tweak these settings, and view diverse content to ensure your picture looks sharp and well-balanced across different lighting conditions. Additionally, understanding display calibration can help you fine-tune your settings for an even better viewing experience. Properly calibrated settings can make a noticeable difference in image quality, enhancing your overall viewing pleasure. This simple step can considerably enhance your viewing experience and visual performance, especially when you consider how ambient light conditions influence perceived picture quality.
Experiment With Color T Settings
Experimenting with color temperature (Color T) settings can considerably improve your TV’s picture quality by tailoring the overall tone to your preference and environment. Adjusting the color calibration helps you achieve more accurate colors, whether you prefer warmer or cooler tones. Changing the color temperature impacts how whites and skin tones appear, creating a more natural or vibrant image. To optimize your viewing experience, consider these tips:
- Use presets like “Warm” or “Cool” to quickly identify your preferred tone
- Fine-tune the color calibration for precise adjustments
- Regularly revisit your settings to match lighting changes in your room
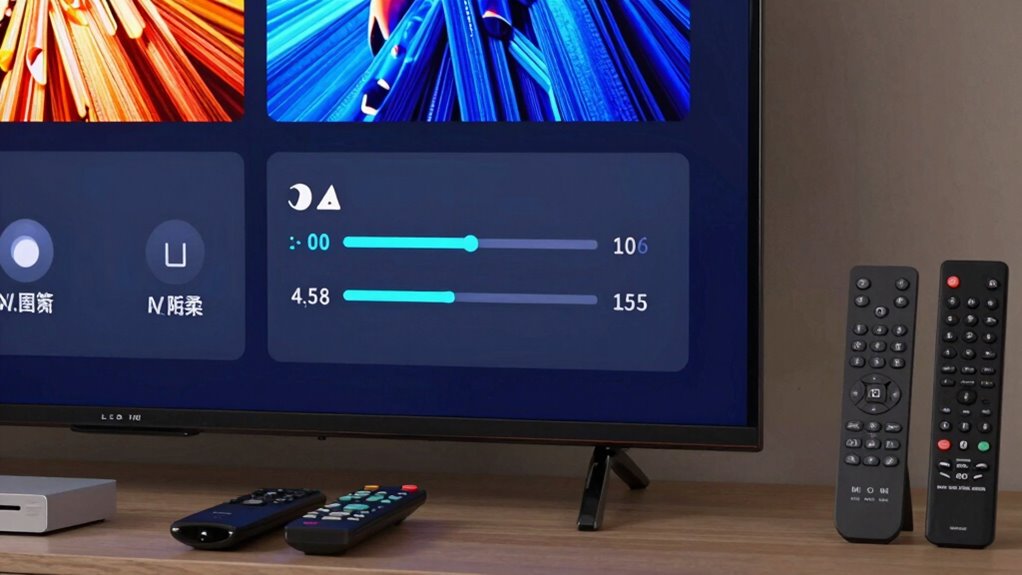
Fine-Tuning Brightness, Contrast, and Backlight
To improve picture quality, start by adjusting the brightness to guarantee images are clear without washing out details. Next, fine-tune the contrast to add depth and make scenes more lifelike. Finally, optimize the backlight intensity to achieve the right balance between brightness and black levels.
Adjust Brightness for Clarity
Fine-tuning your TV’s brightness is essential for achieving clear, vibrant images. Proper brightness ensures details in both dark and bright scenes remain visible, enhancing overall picture quality. During screen calibration, adjust brightness to prevent loss of shadow details without washing out highlights. When calibrating, consider how your adjustments affect color accuracy and overall clarity.
You can improve picture quality by focusing on:
- Matching brightness with ambient lighting for natural viewing
- Using test patterns to fine-tune your settings
- Ensuring your color calibration remains accurate after adjustment
This process helps balance contrast and backlight levels, making dark scenes more detailed without sacrificing overall clarity. A well-calibrated brightness setting guarantees your TV displays images as intended, highlighting every detail for a more immersive experience.
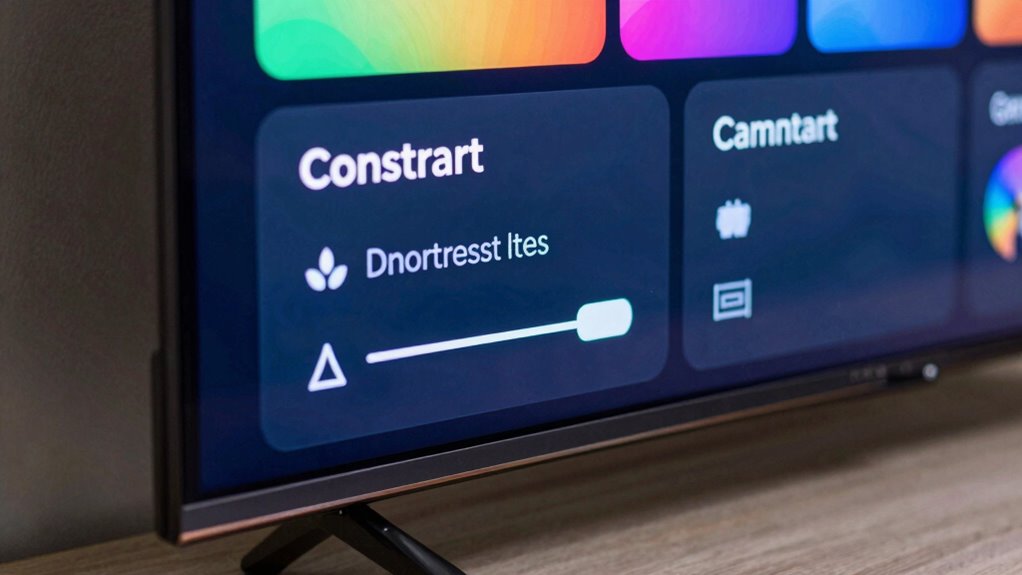
Balance Contrast for Depth
Balancing contrast is essential for adding depth and dimension to your TV picture, and it requires carefully adjusting brightness, contrast, and backlight settings. Start by fine-tuning these to achieve natural color calibration, ensuring colors look accurate without oversaturation. Be mindful of viewing angles, as contrast and color can fade when you’re not directly in front of the screen. If you notice washed-out images or lost detail, lower the backlight slightly or adjust contrast settings for better clarity. Proper balance helps create a sense of depth, making images appear more lifelike. Avoid overdoing adjustments, which can lead to unnatural colors or reduced picture quality from different viewing positions. With some patience, you’ll find a contrast setting that enhances depth without sacrificing color accuracy or viewing experience.
Optimize Backlight Intensity
Adjusting backlight intensity is essential for enhancing your TV’s picture quality, especially in different lighting conditions. Proper backlight levels improve display calibration and ensure vivid images without causing eye strain. To refine, consider your ambient lighting: in a bright room, increase backlight; in a dark room, lower it for better contrast. Here are key tips:
- Match backlight to ambient lighting for balanced brightness
- Use a test pattern to find the right setting without washing out details
- Combine backlight adjustments with contrast and brightness tuning for ideal results
This fine-tuning prevents loss of detail in dark scenes and maintains color accuracy. Remember, a well-calibrated display adapts to your environment, providing a clearer, more immersive viewing experience.
Calibrating Color and White Balance for Accuracy
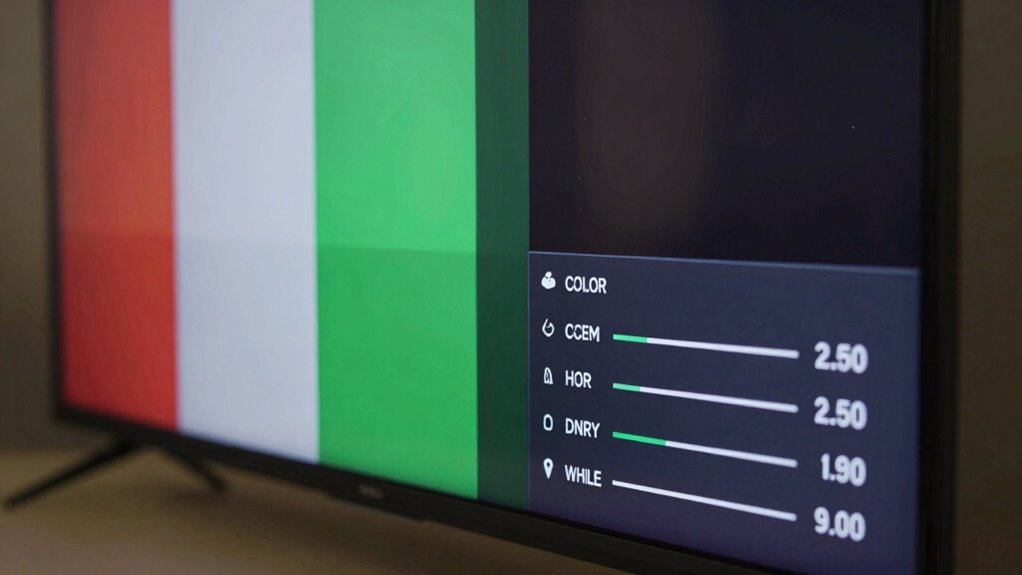
Calibrating your TV’s color and white balance guarantees that images look natural and true to life. Proper adjustments improve color accuracy, ensuring skin tones and scenery appear realistic. Start by accessing your TV’s settings menu and locating the white balance controls. Use test patterns or calibration tools to fine-tune the white balance, making whites appear neutral without a color cast. Avoid overly cool or warm tones that distort the image. Next, adjust the color saturation to achieve natural, vibrant hues without oversaturation. Precise white balance combined with accurate color settings results in a balanced picture, reducing color inaccuracies and enhancing overall picture quality. This calibration step guarantees your viewing experience is as close to real life as possible, providing a more immersive and authentic image.
Tweak Gamma, Sharpness, and Color Space Settings
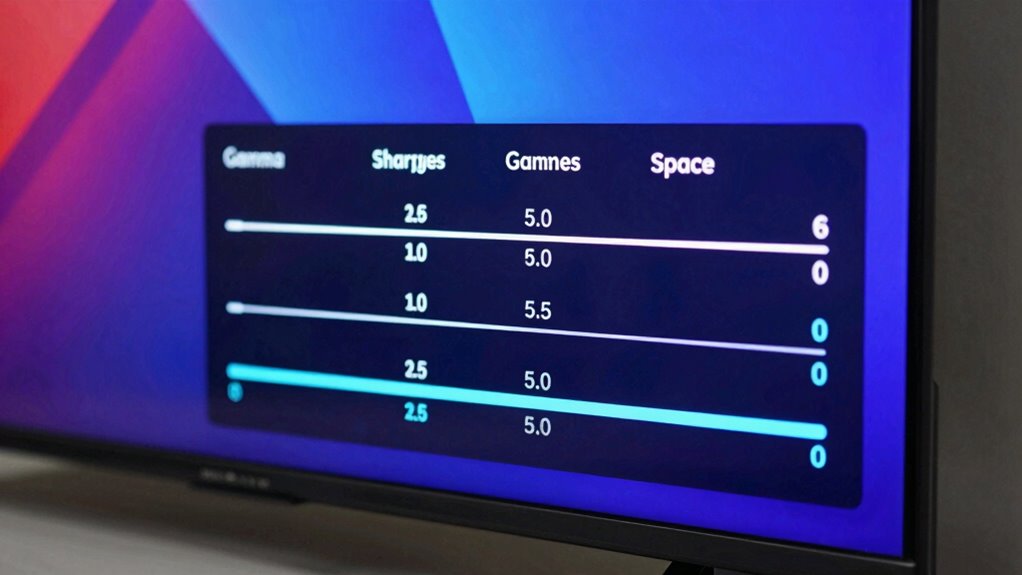
Tweaking gamma, sharpness, and color space settings can considerably enhance your TV’s picture quality, making images appear more vivid and lifelike. Adjusting gamma correction ensures midtones are accurately displayed, reducing washed-out or overly dark areas. Proper color calibration aligns the color space with your content, delivering richer reds, greens, and blues. Sharpness should be set carefully; too high creates unnatural edges, while too low results in fuzziness. To optimize these settings, consider:
- Fine-tuning gamma for natural tonal balance
- Adjusting sharpness to avoid artificial edges
- Selecting the correct color space for your content
These tweaks help reveal more detail and improve overall picture realism, ensuring your TV displays images as intended by the creator.
Save Your Settings With Picture Presets and Profiles
To make your picture adjustments easy to manage and maintain, it’s important to save your preferred settings using picture presets and profiles. This simplifies picture customization, especially if you frequently switch between viewing modes or different content types. By creating and saving custom presets, you can quickly revert to your ideal picture quality without recalibrating each time. Many TVs offer preset management features that allow you to store multiple profiles tailored for movies, sports, gaming, or daytime viewing. This not only saves time but also ensures consistent quality across different viewing scenarios. Taking advantage of preset management helps you maintain perfect picture settings effortlessly, giving you a personalized viewing experience without the hassle of manual adjustments every time.
Hidden Motion Settings for Smoother Picture
Many TVs include hidden motion settings that can markedly improve the smoothness of fast-moving images, but these features are often buried in menus or labeled obscurely. Adjusting frame interpolation or enabling motion smoothing can reduce motion blur and judder, creating a more natural viewing experience. However, some viewers find these effects unnatural or distracting, so experimentation is key. To fine-tune these settings, look for options like:
- Auto Motion Plus or MotionFlow
- Frame interpolation controls
- Judder reduction or blur removal
Troubleshoot Picture Issues With Hidden Options

If you’re experiencing picture issues, hidden options can help you troubleshoot effectively. You can access service menus to fine-tune settings or reset picture defaults to restore ideal quality. Adjusting these hidden settings often solves common display problems quickly and easily.
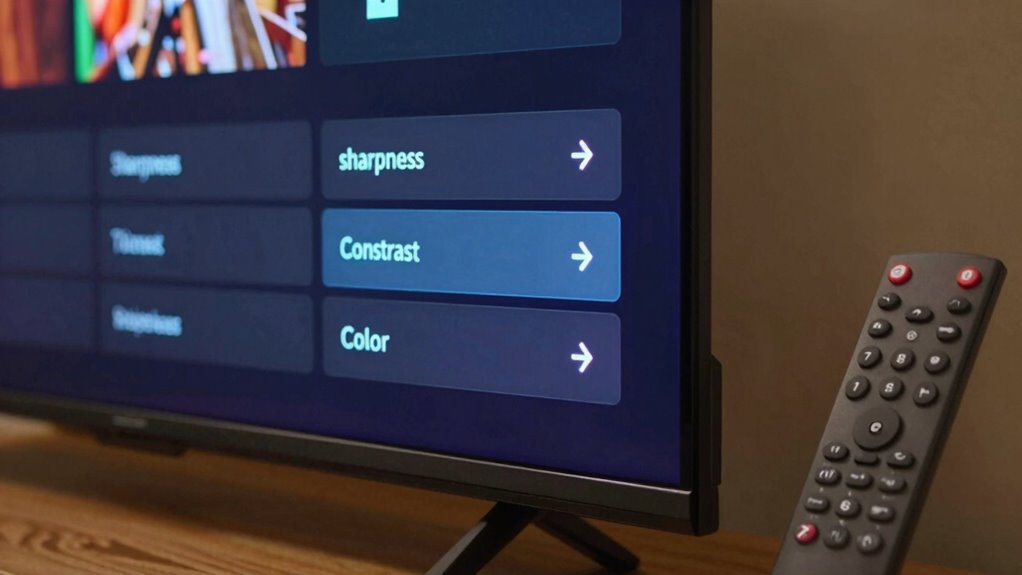
Accessing Service Menus
Accessing the service menu on your TV allows you to fine-tune picture settings beyond what’s available in regular menus. This hidden feature lets you access calibration tools, perform factory resets, and adjust advanced parameters that can resolve picture issues. To access it, you typically press a specific combination of buttons on your remote or use a specialized key sequence. Be cautious—incorrect adjustments can affect your TV’s performance. Inside, you’ll find options like:
- Calibration settings for color, contrast, and brightness
- Factory reset to restore default factory settings
- Advanced controls for fine-tuning picture quality
Always document original settings before making changes, and consider a factory reset if issues persist. Accessing these hidden options provides greater control over your TV’s picture quality, especially when troubleshooting persistent problems.
Adjusting Picture Settings
Once you’ve accessed the service menu, you can directly adjust picture settings to troubleshoot and improve your TV’s display. Focus on color calibration to guarantee colors appear natural and accurate, which can considerably enhance picture quality. Depending on your display technology—LED, OLED, or QLED—the best settings may vary. Fine-tuning contrast, brightness, and sharpness helps achieve a balanced picture without losing detail. Some hidden options allow you to modify color temperature or gamma levels, which can reduce color cast issues or improve dark scene visibility. Remember, making small adjustments can have a big impact, but avoid overcorrecting, as it can cause unnatural images. Properly adjusting these hidden settings allows you to maximize your TV’s display for the best possible viewing experience.
Resetting Picture Defaults
When your TV’s picture looks off despite previous adjustments, resetting the picture settings to their factory defaults can often resolve persistent issues. This simple step reverts any unintended changes and restores ideal calibration techniques inherent to your model. To perform a factory reset, navigate to the settings menu, select the reset option, and confirm. Keep in mind, this process clears custom adjustments, so you’ll need to reapply your preferred calibration techniques afterward. Before resetting, consider these points:
- Note down preferred picture settings to quickly restore them later
- Use the reset to eliminate problematic adjustments causing poor image quality
- Recalibrate your TV after the reset for best results
A factory reset is a quick fix that can help troubleshoot picture issues effectively.
Tips to Maintain Your TV’s Picture Quality Over Time
To keep your TV’s picture quality sharp and vibrant over time, regular maintenance is essential. Start with display calibration to ensure colors, contrast, and brightness stay accurate. Recalibrate periodically, especially if you notice colors fading or image details becoming less clear. Additionally, monitor your screen refresh rate; a higher refresh rate can reduce motion blur and keep motion smooth. Keep your TV’s software updated, as manufacturers often release updates that optimize picture settings and fix bugs. Avoid static images for extended periods to prevent burn-in, especially on OLED screens. Clean the screen gently with a microfiber cloth to remove dust and fingerprints that can dull picture quality. Following these tips will help maintain a consistently stunning display for years to come.
Frequently Asked Questions
Can Hidden Settings Be Adjusted Without Voiding the Warranty?
Yes, you can adjust hidden settings without voiding your warranty if you follow warranty safety guidelines. Use hidden adjustment tips carefully, sticking to adjustments within the TV’s menu or using manufacturer-approved tools. Avoid opening the device or modifying hardware, as this can void your warranty. Always consult your TV’s manual or customer support before making changes to ensure you stay within warranty safety limits.
Are There Risks in Modifying Advanced Picture Settings?
Modifying advanced picture settings can carry some risks, especially if you adjust firmware settings or experiment with hidden options. You might inadvertently cause display issues or void your warranty if the manufacturer considers these changes unsupported. Always check your TV’s warranty policy before making adjustments, and consider firmware updates carefully—some can improve performance, but others might reset your settings or cause compatibility problems. Proceed cautiously to avoid potential issues.
Do All TV Brands Offer Hidden Picture Enhancement Options?
Like a secret garden hiding treasures, not all TV brands offer hidden picture enhancement options. Some, like Samsung or LG, include brand-specific features you can access through advanced menus, while others may have universal hidden options. You’ll find that the availability and ease of revealing these settings vary, so exploring your TV’s manual or online guides helps you uncover these hidden gems for better picture quality.
How Often Should I Recalibrate My Tv’s Picture Settings?
You should recalibrate your TV’s picture settings every six months or when you notice changes in picture quality, like color shifts or dimness. Regular calibration guarantees ideal adjustment intervals, keeping your picture sharp and vibrant. If you upgrade your TV or change viewing environments, recalibrate sooner. Maintaining this routine helps you enjoy the best picture possible, preventing image degradation over time and ensuring consistent viewing experiences.
Are There Recommended Tools or Apps for Professional Calibration?
Imagine your TV as a canvas, and calibration software as the artist’s brush. You can use professional tools like CalMAN or SpectraCal to fine-tune picture quality with precision. These calibration software options offer detailed controls, ensuring your display produces true-to-life colors and ideal contrast. While they’re primarily for professionals, some user-friendly apps like Portrait Displays’ CalMAN Ultimate or even basic colorimeter devices can help enthusiasts achieve professional-level calibration at home.
Conclusion
By exploring and adjusting those hidden settings, you can unleash your TV’s true potential and enjoy a stunning picture every time. Don’t settle for default images when small tweaks can make a big difference. Are you ready to take control of your viewing experience and see your favorite shows and movies in their best light? With a little effort, you’ll never want to go back to the default settings again.